Category Archives: Advanced Strategy Guides

Mastering Trading Strategies: Your Guide to Outsmarting the Pattern Day Trading Rule

Mastering the Pattern Day Trading Rule for 0DTE Traders

Are you a savvy trader looking to navigate the Pattern Day Trading Rule while maximizing your 0DTE butterfly strategy’s potential? This guide delves into how zero-days-to-expiration (0DTE) traders can stay compliant with regulations, avoid common pitfalls and leverage unique trading techniques that align with their goals. Whether you’re a seasoned options trader or just starting out, understanding the nuances of the Pattern Day Trading Rule is crucial to your success.

Understanding the Pattern Day Trading Rule and 0DTE Implications

For 0DTE options traders, the Pattern Day Trading Rule (established by FINRA) can present unique challenges. This regulation applies when you execute four or more day trades within five business days, and it requires maintaining a minimum account balance of $25,000 in a margin account. You risk significant restrictions if classified as a pattern day trader without meeting the account balance requirement. For those trading 0DTE butterflies, this rule can feel particularly limiting due to the frequent adjustments and quick trade turnover that are often needed.

However, one strategic workaround involves transforming an active 0DTE butterfly position into a “box trade.” This technique involves shifting all shorts to longs, all longs to shorts, and converting puts into calls (or vice versa). Doing so creates a risk-neutral position that allows both trades to expire without triggering a pattern day trade count. Implementing such strategies can help you remain compliant while still capitalizing on short-term market opportunities.

Why a Solid 0DTE Trading Strategy Matters

When trading 0DTE butterflies, having a well-defined strategy isn’t just a best practice—it’s essential. The rapid time decay, the narrow profit windows, and the potential for sudden volatility mean that a structured approach is the foundation of success. A disciplined 0DTE trading strategy helps you:

Determine Optimal Strikes: Use market conditions and volatility indicators to position your butterfly spreads for the highest risk-to-reward ratio.

Adapt to Market Volatility: Adjust butterfly widths and positions as volatility shifts throughout the day.

Lock in Profits Strategically: Employ techniques like the box trade to secure gains without violating day trading rules.

Control Risk Tightly: Implement position sizing and conditional orders to protect your account from major losses.

Risk Management Techniques for 0DTE Butterfly Traders

Effective risk management is critical when trading 0DTE options. Given the fast-moving nature of same-day expirations, even small errors can lead to outsized losses. Key risk management tactics include:

Using Conditional Orders: Set conditional orders to automatically execute a box trade when your butterfly reaches a certain profit target, preventing a manual close-out that could trigger a pattern day trade.

Position Sizing Based on Volatility: Adjust the width of your butterfly spreads depending on the current implied volatility (IV). In high-IV environments, consider wider spreads for better reward potential; in low-IV environments, narrower spreads can help reduce risk.

Daily Performance Reviews: Monitor how your 0DTE butterfly trades perform under different market conditions, refining your approach over time.

Psychological Resilience for 0DTE Trading

Trading 0DTE butterflies demands a clear, focused mindset. These trades’ short timeframe and precise nature mean that emotions can run high. To stay disciplined:

Develop a Routine: Establish a consistent morning analysis process, reviewing the market structure, volatility conditions, and potential butterfly strike placements before making any trades.

Embrace Continuous Improvement: View each trade as a learning opportunity, understanding that long-term success comes from gradual refinement of your strategy.

Avoid Overtrading: With 0DTE trades, chasing every small movement is easy. Instead, stick to your trading plan and execute a few well-planned setups daily.

Tools and Resources for 0DTE Trading

Access to the right tools can make a world of difference. For 0DTE butterfly traders, these resources are invaluable:

A Robust Trading Platform: Look for platforms that provide detailed options chains, advanced charting tools, and real-time data.
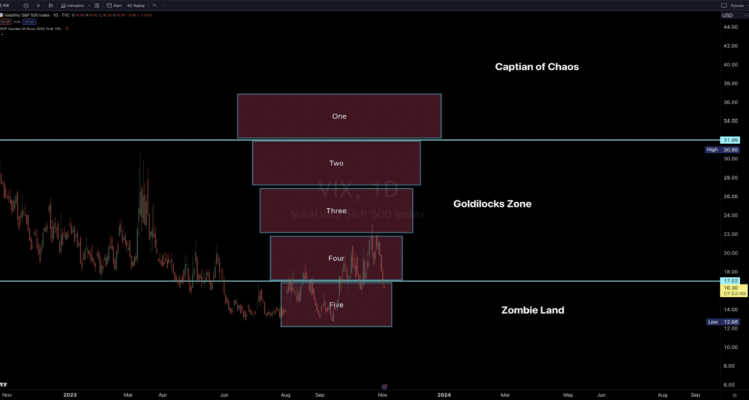
Volatility Indicators: Regularly consult the VIX or similar indicators to gauge current IV levels and adjust your butterfly strategy accordingly.

Educational Materials: Stay up-to-date with webinars, trading communities, and forums focused on 0DTE strategies. These can help you learn new techniques, improve your edge, and maintain consistency.

Avoiding Common Mistakes in 0DTE Trading

Even experienced 0DTE butterfly traders can fall into traps if they aren’t careful. Some of the most common errors include:

Failing to Adjust to Volatility: Forgetting to modify butterfly widths as IV changes can lead to suboptimal risk-reward ratios.

Ignoring Risk Management: Skipping steps like conditional orders or proper position sizing can quickly erode account equity.

Neglecting Psychological Preparation: Overreacting to market fluctuations or holding losing positions too long undermines the discipline needed for consistent profits.

Conclusion: Excelling as a 0DTE Butterfly Trader

The Pattern Day Trading Rule doesn’t have to hold you back as a 0DTE butterfly trader. By understanding how to lock in profits through techniques like box trades, you can stay compliant while continuing to refine your approach. Build a solid foundation by focusing on strategic butterfly placements, disciplined risk management, and ongoing personal development. With the right mindset and a commitment to continuous improvement, you can thrive in the fast-paced world of 0DTE trading while minimizing risks and maximizing opportunities.

FOMC Dystopian World

My Take: When it comes to the complexity and contentious nature of central banking policies and their real-world implications, the Federal Reserve operates on a dual mandate: to maximize employment and stabilize prices. In theory, these objectives should go hand in hand, contributing to a robust and sustainable economy.

Analysis: The relationship between employment, inflation, and monetary policy is multifaceted and not always linear. Traditional economic theories, like the Phillips Curve, suggest an inverse relationship between inflation and unemployment. However, real-world scenarios don’t always align with theoretical expectations.

  1. Government Spending and Debt Monetization: Expansionary fiscal policies, such as increased government spending and central banks’ subsequent monetization of debt, can fuel inflation. This influx of capital can boost demand, but when it outpaces supply, prices can soar.
  2. Employment and Inflation: The notion that strong employment markets cause inflation is a debated topic. While a thriving job market can increase disposable income and consumption, leading to higher demand and potentially higher prices, it’s not the sole driver of inflation.
  3. The Fed’s Approach: The Federal Reserve might tighten monetary policy (e.g., raising interest rates) to combat inflation, even if it comes at the cost of employment. The goal here is to cool down an overheated economy, which can lead to increased unemployment and market volatility.

The Dystopian Perspective:

  • Questioning the Status Quo: It’s essential to evaluate and question the prevailing economic policies and approaches critically. Open discourse and a diversity of perspectives contribute to a more holistic understanding and better policy-making.
  • Navigating the Landscape: As a trader and coach, understanding, adapting, and navigating these economic landscapes, even when they seem “dystopian,” is crucial. It allows you to make informed decisions, manage risks, and seek opportunities in the market’s reactions to these policies.

In this intricate dance of policies and market reactions, being informed, adaptable, and strategic is key. It’s about navigating the markets with insight, strategy, and a critical mind, ready to capitalize on opportunities that these economic dynamics present. Keep pushing forward, staying informed, and adapting to the ever-evolving economic narrative.

The FOMC SWAG

My Take: The Fed moves forward with their decisions as if they know the effect of them, but the reality is that they don’t know. They are almost always wrong in their long-term predictions on economic impact, inflation growth, and general market stability. It would seem everything they do is a SWAG (Scientific Wild Ass Guess), with the science part being the lesser part of that acronym.

Analysis: The Federal Reserve, with all its tools, models, and expertise, often sails in uncharted waters. Economic forecasting is not an exact science, and despite their thorough analysis and methodologies, predicting economic outcomes with absolute certainty is a tall order.

Here’s the breakdown:

  1. Uncertainty: The economic landscape is vast and influenced by a myriad of ever-changing variables. The list is endless for global events, technological advancements, political shifts, and consumer behavior. It creates an environment of inherent uncertainty.
  2. Policy Repercussions: Decisions made by the Fed, such as adjusting interest rates or asset purchasing programs, send ripples through the economy. However, the full impact of these decisions often unfolds over time and can be influenced by various unforeseen factors.
  3. Adaptability: Given the dynamic nature of the global economy, adaptability becomes key. The Fed, like traders, must be prepared to pivot their strategies based on evolving economic conditions and outcomes.

In the Trading Arena:

For traders, this uncertainty and the unpredictability of economic outcomes underscore the importance of flexibility, continuous learning, and risk management in trading strategies. The “SWAG” nature of economic decision-making implies that traders must be on their toes, ready to adapt to new information, policy shifts, and market reactions.

Your Strategy:

  • Stay Informed: Keep abreast of the Fed’s decisions, economic indicators, and global events. Knowledge is your first line of defense and your most potent tool for making informed trading decisions.
  • Risk Management: Given the unpredictability, ensure your trading strategy includes robust risk management protocols. Be prepared for volatility and ensure your positions are adequately hedged.
  • Continuous Learning: The only constant is change. Continuous learning, adapting, and evolving trading strategies based on new information and changing economic landscapes are crucial.

So, while the economic forecasts and policy decisions might seem like a “SWAG” at times, your trading strategy doesn’t have to be. With knowledge, adaptability, and a solid risk management plan, you can navigate the markets with confidence and precision. Keep grinding, stay adaptable, and may the markets be in your favor!

IS THE FED A POLITICAL MONSTER?

My Take: The problem here seems political because the Federal Reserve NEVER takes or assumes responsibility for its actions, often placing blame on the consumer or other forces but always deflecting responsibility from themselves. They are one of the greatest influencers in the market, yet they NEVER acknowledge it.

Analysis: This is a poignant aspect of central banking – accountability and influence. The Federal Reserve wields significant power over the economic landscape, and their decisions ripple through markets, industries, and households.

Influence:

  • The Fed’s policies undoubtedly play a massive role in shaping economic trajectories. Their interest rates and monetary policy decisions influence investment, consumption, and overall economic momentum.

Accountability:

  • The notion of accountability is critical. The Fed operates with a mandate to promote maximum employment and price stability. However, the broader impacts of their policies, whether it be asset bubbles, inequality, or market dependencies, are not always fully acknowledged or taken responsibility for.

Political Dynamics:

  • Central banks operate within complex political and economic environments. Their decisions, while economically motivated, are not made in a vacuum and can be influenced by, or have implications on, the political landscape.

For Traders:

  • Understanding the political and economic dynamics that influence central bank decisions is crucial. It adds a layer of insight into market movements and potential shifts in monetary policies.

Strategy Moving Forward:

  1. Critical Evaluation: Always critically evaluate central bank statements and decisions. Look beyond the immediate policy implications and consider broader economic and political influences.
  2. Diversify: Given the uncertainties and influences in play, diversifying trading strategies can help manage risks associated with central bank decisions.
  3. Stay Informed: Keeping abreast of political developments, policy shifts, and broader economic trends is crucial. It provides a more comprehensive view of the market landscape.

The Fed’s influence is undeniable. For traders, it’s about navigating the markets with a nuanced understanding of these influences, making informed decisions, and managing risks effectively. It’s about playing the chessboard with a strategist’s mind, anticipating moves, and planning accordingly. Keep pushing forward with clarity, strategy, and unwavering focus

VIX Adjustments

Guide to Adjusting Trading Strategies Based on Volatility

Introduction

This guide helps traders adjust their trading strategies based on market volatility, specifically the Time Warp strategy and Batman configurations. By understanding the volatility regime (big picture) and local implied volatility (IV) (daily picture), you can optimize your trades and manage risks effectively.

Understanding the Basics

Market Influences:

  • Economic Reports: Employment data, GDP reports, inflation figures, etc.
  • Geopolitical Events: International conflicts, policy changes, elections, etc.
  • Earnings Announcements: Quarterly reports, forecasts, company news, etc.
  • Significant Events: Major industry news, unexpected events, natural disasters, etc.

Volatility Regime (Big Picture):

  • Zombieland (VIX Below 17): Characterized by low volatility and stable market conditions.
  • Goldilocks Zone (VIX Between 17-32): Moderate volatility, balanced market conditions.
  • Chaos Zone (VIX Above 32): High volatility, unstable market conditions.

Local Implied Volatility (Daily Picture):

  • Daily fluctuations in IV are influenced by immediate market events.
  • Requires constant monitoring to adjust trading strategies accordingly.

Adjusting Strategy Characteristics

1) Number of Days Out (Time Warp Strategy):

Zombieland (VIX Below 17):

  • Days to Expiration (DTE): Use multiple DTE strategies (1, 2, or 3 DTE) to capture limited price movements and premium decay over several days.
  • Overnight Market Moves: The Time Warp strategy is particularly useful when a significant percentage of market moves occur in the overnight session, resulting in small doji days. This allows traders to recapture directional moves they would normally miss in a 0-DTE trade.
  • Infrequent Usage: This strategy adjustment is not used often and is used only in low volatility situations with unusual overnight gap situations.
  • Example: When VIX is around 12-13, consider placing trades with 1-3 DTE to account for the low volatility environment and overnight market moves.

Goldilocks Zone (VIX Between 17-32):

  • Days to Expiration (DTE): Focus on shorter DTE (0-DTE to 2-DTE) to take advantage of moderate volatility and quicker premium decay.
  • Example: If VIX is around 20-25, use 0-2 DTE trades to benefit from the balanced market conditions.

Chaos Zone (VIX Above 32):

  • Days to Expiration (DTE): Primarily use 0-DTE trades to manage the high volatility and capture rapid premium decay.
  • Example: With VIX above 32, deploy 0-DTE trades to effectively navigate the high volatility environment.

2) Using the Batman Strategy:

Zombieland (VIX Below 17):

  • Batman Strategy: Generally not used in low volatility environments due to limited price movements.
  • Example: Avoid Batman configurations when VIX is below 17; focus on narrower butterfly spreads.

Goldilocks Zone (VIX Between 17-32):

  • Batman Strategy: Effective in this range, offering a balance between risk and reward.
  • Risk-to-Reward Ratios: Use varying ratios (30-70%, 40-60%, 70-30%) based on specific VIX levels.
  • Percentage of Time: The Batman strategies range (e.g., 40-60%) indicates the percentage of time you choose between a single OTM fly and a Batman configuration.
  • Example: If VIX is around 25, you might choose Batman configurations 40% of the time and a single OTM fly 60% of the time for better risk management.

Chaos Zone (VIX Above 32):

  • Batman Strategy: Highly effective, providing wide spreads to handle significant price movements.
  • Risk-to-Reward Ratios: Use wider ratios (e.g., 30-70%) to accommodate the higher volatility.
  • Percentage of Time: Adjust the frequency of using Batman configurations versus single OTM flies based on the specific VIX level.
  • Example: With VIX above 32, deploy Batman configurations with appropriate risk-to-reward ratios to manage increased market risk and use them more often.

Monitoring and Adapting

Monitor Local IV:

  • Use real-time data and alerts to track daily IV changes.
  • Adjust the number of DTE and strategy configurations based on significant IV shifts.

Adapting to Daily Influences:

  • If a daily economic report or event causes a notable IV spike, immediately adjust your strategy.
  • Example: If VIX jumps from 12 to 15 due to a weak employment report, adjust from multiple DTE trades to single DTE trades with wider butterfly spreads.

Continuous Learning:

  • Stay informed about market conditions and upcoming events.
  • Engage with the trading community to share insights and strategies.

Conclusion

Adapting your trading strategies, such as the Time Warp strategy and Batman configurations, based on the volatility regime and local IV is crucial for managing risk and maximizing returns.

Following this guide, you can better navigate different market conditions and enhance your trading performance.

Volatility Realms: Chaos, Goldilocks & Zombieland

The chart effectively communicates how you adjust the width of your Butterfly spreads and overall risk in response to varying volatility regimes in the VIX. Different volatility environments (Chaos, Goldilocks, Zombie Land) necessitate different strategic adjustments to optimize trading performance and manage risk efficiently.

  1. Chaos (Captain of Chaos): When the VIX is roaring, and the market feels like a rollercoaster on steroids, we’re squarely in the realm of Chaos. It’s tumultuous, but it’s also ripe with opportunities. Here, the strategy leans towards wider Butterfly spreads, adapting to the increased volatility. The boxes from ‘One’ to ‘Five’ illustrate a progressive widening of spread widths, symbolizing an expansion of risk and potential reward in the tumultuous environment.
  2. Goldilocks Zone: Neither too hot nor too cold. This is where the market feels just right. Volatility is present but doesn’t throw the market into a frenzy. Here, our strategy finds a balanced footing, exercising a medium width in Butterfly spreads, ensuring that we are positioned to capitalize on market movements without overexposing ourselves to risk.
  3. Zombie Land: In the eerie calm where the VIX is low and the market lethargically moves, welcome to Zombie Land. Here, the strategy is tuned towards narrower Butterfly spreads. With lower volatility, the approach is more conservative, leaning towards precision and protection of capital.

The Sweet Spot: Embracing Variability

Nobody has a crystal ball in trading. We’re not fortune-tellers; we’re strategic navigators. Seeking the ‘sweet spot’ in trade setups is an ongoing quest. Since perfection is elusive, embracing a range of values in Butterfly widths and risk-torewards is essential. It’s like casting a net, ensuring a diversified approach that can resonate with different market vibrations.

Analyze, Correlate, Adapt

Regular analysis and correlation with market structures, volatility, and price action are crucial. It’s not about setting a strategy on autopilot; it’s about continuous evolution and adaptation. By analyzing performance, correlating it with market variables, and adapting based on insights, we ensure that the strategy remains dynamic and resonant with market rhythms.

Conclusion: Navigating the Volatility Seas

Our trading philosophy is akin to navigating the vast seas of volatility. Different weather (volatility regimes) require different navigational strategies (Butterfly widths and risk-to-rewards). The goal is not to conquer but to adeptly navigate, ensuring that our trading ship withstands the market’s storms and finds prosperous routes to success.

Remember, in the world of trading, adaptability is our greatest ally, and continuous learning is our most potent weapon. Armed with this wisdom, let’s continue our journey on the seas of the market, navigating with strategy, precision, and a relentless spirit of exploration and improvement